WECSOG Auto Mag |
Post Reply 
|
Page 123 23> |
| Author | |
TRX302 
Callahan's Auto Mag 

Joined: 02 Dec 2011 Location: Arkansas Status: Offline Points: 682 |
 Post Options Post Options
") Thanks(0) Thanks(0)
 Quote Reply Quote Reply
 Topic: WECSOG Auto Mag Topic: WECSOG Auto MagPosted: 22 Apr 2012 at 1:12am |
|
W.E.C.S.O.G. = Wile E. Coyote School of Gunsmithing
I picked up a set of blueprints from Max last year. I ogled them until my wife finally said, "Go ahead, you know you want to." When I explained that it would take a lot of time and money, she offered to help pay for it. With spousal buy-in, how could I resist? Besides some gunsmithing experience, I worked in a production machine shop for a few years, and have operated an automotive machine shop since the mid-'90s, and have had a modest hobby machine shop for 20 years. Having built a few rifles and seriously scoped out what it would take to whittle a 1911 frame from scratch, I figured it would take about three years to finish the project and it would cost me enough to buy one or even two decent Auto Mags off Gunbroker. That's within the hobby time and money budget since I got rid of the race car. I'm planning to build the barrel, barrel extension, bolt, frame, cocking piece, and a few odd parts. The prints from Max covered the barrel, barrel extension, bolt, and various minor parts. Bruce Stark's book had a number of drawings of smaller parts. That left quite a few parts with no drawings; the holdopen, trigger bar, sear, etc. I've been picking them up a few at a time form eBay, Gunbroker, and Walter's site. $112 for the bolt holdopen? Urk! I've bought functioning firearms for less than that. I could have reverse-engineered a bunch of that stuff, but frankly, even that kind of pricing is acceptable if I want to actually finish this project. With the prints and parts spanning multiple manufacturers over several decades, I expect "some fitting may be required" to make the bits play nice together. I have a decent hobby machine shop, but the mill dates from 1942 and the lathe from 1955 and they both led hard lives before I got them. To be brutally honest, I've been lax in maintaining and repairing them. So I'm removing the single phase motor I put on the mill in 1993 and putting the 5-gallon-bucket-sized original three phase motor back on, with a VFD. But I can't lift anything like that any more, so I'm building a gantry crane to do it, which will also let me move the rotary table and vise off when I need to. And I picked up a DRO for it, and I'm doing flood and micro-drop coolant feeds. The lathe gets coolant feeds too, and I made a steady rest for it. I'm working on a spider setup to center the barrel, and I bought a spare tailstock off eBay to use for chambering. The original tailstock only has 1-1/2" of travel, and I have some rifle barrels I need to chamber as well, so I'm building a new lever-operated ram to get extra travel. Next up is a taper/profile attachment for profiling barrels. I also have a new motor and VFD for the lathe. There's a box of steel for building fixtures, some O-1 drill rod for making the chambering reamer, plain cold-rolled steel for proofing setups, and 4130 and 4140 steel for making the actual parts. I've already made a couple of purchases of tooling; drills, reamers, milling cutters, and so forth. I have a plastic tackle box to keep all the Auto Mag tooling separate from the general-use tooling. There's a big box of high temperature firebrick, a closed loop temperature controller, resistance wire, and angle iron to make a heat treat oven. I have plans for a shop-built Rockwell tester I got from a knife forum; with the correct diamond penetrator and test patches it should work okay. I have a Green Mountain barrel blank, a bag of new Starline brass, a couple of boxes of 240gr JHPs, powder, and primers. Part of the next Discretionary Spending Event will get the dies. I have a loose-leaf notebook with dividers for shop sketches, machining sequences, speeds and feeds, and fixture sketches for the parts I have to make. Yes, there's still a long way to go, but progress is steadily being made. |
|
 |
|
|
MAX GERA
R.I.P. 

Joined: 08 May 2009 Location: Pennsylvania Status: Offline Points: 320 |
Post Options
Thanks(0)
Quote Reply
Posted: 22 Apr 2012 at 1:36am |
|
Dave: I your have not yet gotten the VFD, you will be better off with a standard rotary phase converter. It will not cost that much more and your machine will thank you for it. BTW, the worst thing that you can use to chamber a barrel, IS the tail-stock!  Max
|
|
|
|
|
TRX302
Callahan's Auto Mag
Joined: 02 Dec 2011 Location: Arkansas Status: Offline Points: 682 |
Post Options
Thanks(0)
Quote Reply
Posted: 22 Apr 2012 at 2:12am |
|
I have a nice phase converter I built a few years after doing the hack job on the mill. I got the VFD at a price I couldn't resist, and since the mill has step pulleys to vary the speed, I figured the variable speed part of the VFD might be handy. The table and coolant pump motors are also three phase, and I'll power them via the phase convertor. I've had the machine for 20 years and I've been cranking handles and brushing on oil because I never took the time to wire the thing properly.
I'm guessing you're referring to the people who run a reamer in with a drill chuck or Morse socket, or on the tip of a dead center. Any misalignment of the tailstock and headstock can cause taper error in the chamber. I'm working on a reamer holder that slides around on the flat face of the new tailstock ram. It might be overkill, particularly if the barrel is properly centered in the spider and the tailstock is aligned, but if I have to build a holder anyway... I've seen pictures of setups where people used the carriage to push the reamer in. My lathe has a lot of backlash in the carriage handwheel, and I felt I'd have better feel with the tailstock. |
|
|
|
|
7mmMKsuper
International Auto Mag 

Joined: 02 Feb 2009 Location: Georgia Status: Offline Points: 133 |
Post Options
Thanks(0)
Quote Reply
Posted: 22 Apr 2012 at 7:30am |
|
All of my machines, were and still are three phase. I do however use a VFD, (three phase of course) to vary the speed when needed. I run a 7.5 HP rotary phase converter, and if I really need to move some metal on the horizontal mill, I just keep the other machines running at idle, as it helps with the "wild" leg voltage.
good luck with your project, MK |
|
|
|
|
MAX GERA
R.I.P.
Joined: 08 May 2009 Location: Pennsylvania Status: Offline Points: 320 |
Post Options
Thanks(0)
Quote Reply
Posted: 22 Apr 2012 at 4:02pm |
I have been using a carriage mounted set-up for reaming barrels for the last forty years. It's much easier and faster to use. Not to mention more accurate: it's very easy to get the reamer holder absolutely centered. Every floating reamer holder that I have tried, seems to "float" only when not cutting. I'm sure that someone makes a ball bearing model somewhere, but I have not seen it. The carriage wheel gives a much better "feel" while cutting and it's much faster on clearing the chips. Also, with the travel indicator set-up, I can get the correct head-space with only one reading every time. 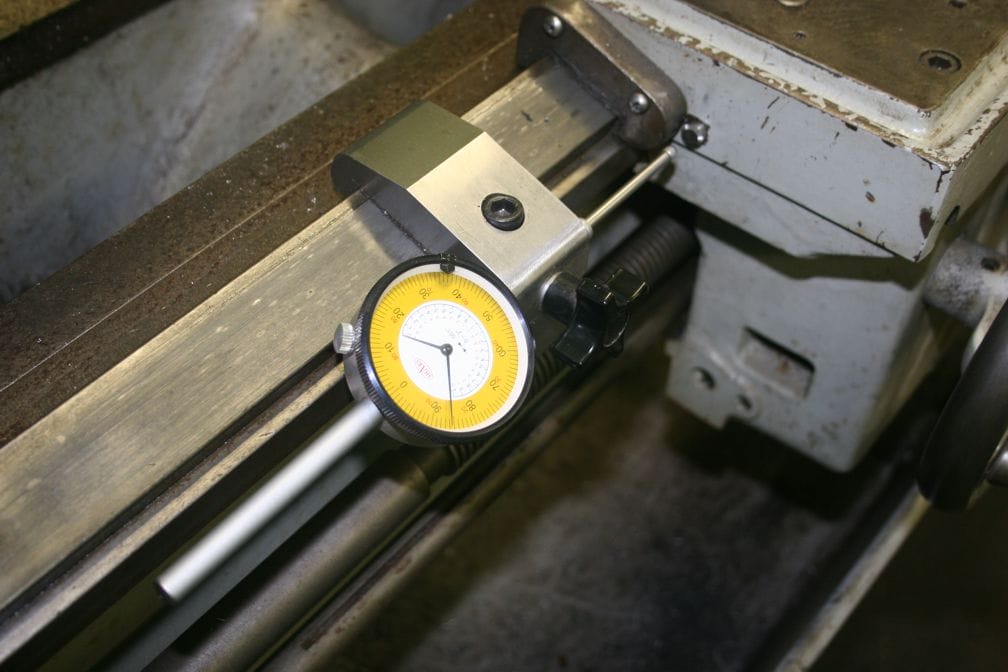 |
|
|
|
|
jw4570
Callahan's Auto Mag
Joined: 08 Mar 2008 Location: FL Status: Offline Points: 1334 |
Post Options
Thanks(0)
Quote Reply
Posted: 22 Apr 2012 at 4:04pm |
|
Max,
why don't you like a VFD? I have one on my drill press, and I like it a lot. Jason
|
|
|
|
|
TRX302
Callahan's Auto Mag
Joined: 02 Dec 2011 Location: Arkansas Status: Offline Points: 682 |
Post Options
Thanks(0)
Quote Reply
Posted: 22 Apr 2012 at 4:19pm |
|
You have a point. I'll stick the spare tailstock under the lathe and use the carriage. If nothing else, it'll save the time making a new ram and lever setup for it!
|
|
|
|
|
MAX GERA
R.I.P.
Joined: 08 May 2009 Location: Pennsylvania Status: Offline Points: 320 |
Post Options
Thanks(0)
Quote Reply
Posted: 22 Apr 2012 at 4:30pm |
|
Jason,
I have a 7.5 hp RPC and with it i I can run all my machines at once, without any switching and each at its own speed. I have the idler in the attic, so it's like it doesn't even exist. Also, I have seen more than one VFD that was not very smooth on starting. Just a preference. Max
|
|
|
|
|
TRX302
Callahan's Auto Mag
Joined: 02 Dec 2011 Location: Arkansas Status: Offline Points: 682 |
Post Options
Thanks(0)
Quote Reply
Posted: 22 Apr 2012 at 6:20pm |
|
Max, do you have any recommendations for machining the outside of the frame ring?
Using a small diameter endmill and the rotary table will leave corner radii that would have to be cleaned up. How did you do it? Formed flycutter? Custom side cutter? Use the quill and rotary table as a shaper? |
|
|
|
|
MAX GERA
R.I.P.
Joined: 08 May 2009 Location: Pennsylvania Status: Offline Points: 320 |
Post Options
Thanks(0)
Quote Reply
Posted: 22 Apr 2012 at 6:46pm |
|
If I recall correctly, I think that I drilled two holes from the back of the frame (where the ring meets the frame), roughed out the shape and finished it with a boring head, rotating it back and forth by hand.
Today, I'd just use a form wheel on my surface grinder. Like this: 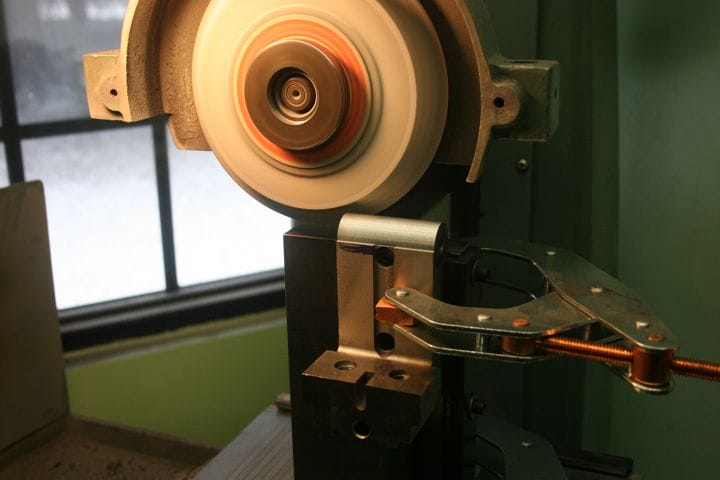 |
|
|
|
|
Post Reply
|
Page 123 23> |
| Tweet |
| Forum Jump | Forum Permissions You cannot post new topics in this forum You cannot reply to topics in this forum You cannot delete your posts in this forum You cannot edit your posts in this forum You cannot create polls in this forum You cannot vote in polls in this forum |


 Topic Options
 TRX302 wrote: